| Spot Layer Tool | |
|---|---|
|
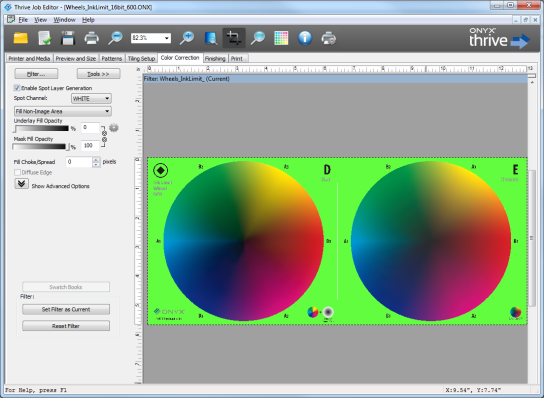
The Spot Layer Tool allows you to use Specialty Inks such as White ink. You can also use this tool for Knockouts.
You can access this tool by clicking [Tools] in the Color Correction Tab and selecting [Spot Layer Tool].
[Enabling Spot Layer Generation] activates the available tools.
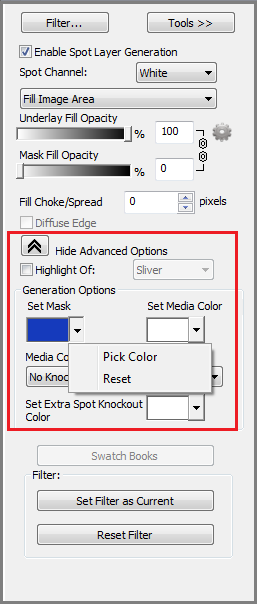
Generation Options determine the color of your mask and media. You can also use [Generation Options] to set your Knockout options.
To set the Mask Color: Click the Sample box to activate the color picker or use the drop down arrow to pick the color from the preview (Figure 2).
This defines which spot channel you are working with and defaults to the first spot channel.
A [Highlight] is the auto-generated layer for “Spot2” and it creates a fill in the image anywhere there is no data for “Spot1”. This option is only visible if your media has been configured for multiple spots. To create a highlight, change [Spot Channel] to “Spot2” because that is the one you’re working with and then change the [Highlight Of] to" Spot1". Then use the tools to customize your “Highlight of Spot1”.
This option sets the [Underlay] and [Mask fills] to 100% and locks them so that they are the same values. You can adjust the values using the sliders. This option auto-generates a flood fill for the entire image by combining the underlay and mask fills together. When you check this option, the underlay and mask fill sliders lock together and are set at 100%. You can change the opacity for the flood fill by moving either of the sliders.
This option auto-generates a fill in the selected spot channel where image data exists. The fill will be generated anywhere image data does not match the mask. For example, if your image is on a white background and the default (white) mask is used, this option will create a fill for all non-white data.
This option generates a fill in the selected Spot Channel where mask data exists. The fill is generated anywhere the mask data matches the Mask Color. For example, if your image is on a white background and the default (white) mask is used, this option will create a fill for all white data.
[Choke] reduces the outer edge of the underlay. If the printing image has the spot layer misaligned with the image, use [Choke] to make the spot layer smaller. [Spread] increases the outer edge of the underlay fill. Use [Spread] when you want a deliberate halo around the edge of your image.
[Choke] and [Spread] work in tandem. Each mark on the slider represents 1 pixel width of choke or spread up to 10 pixels (+-). The actual preview in Job Editor is exaggerated from what is printed. This exaggerated display makes it easier for the user to see the results from moving the slider.
This option creates a gradual transition from the underlay to the mask. The effect is a soft edge. Use this option when you want a gradual transition from the underlay to the mask to create a soft edge for the fill.
Once you’ve defined your settings, save them by exporting the filter to use on similar jobs. Filters are a global color correction that can be applied to Quick Sets to automate the printing process for multiple jobs that use the same settings. |
Figure 1
Figure 2
|