| Ink Restriction | |
|---|---|
|
The Ink Restriction is the process of determining maximum amount of “usable ink” per individual printer channel that a media coating can accommodate without print problems. Print problems can consist of wet ink, bleed, mottling, cracking, smudging or flaking. The [Ink Restriction] also sets the maximum available ink from which to achieve an ink and media’s potential gamut. Keep in mind that by maximizing individual channels, two or more combined channels may also result in artifacts. The Ink Limit profiling step is used to address these combinations of ink channels (See Ink Limit help).
The simple process of [Print, Read, Next…] is recommended in order to save time. This method takes the guess work out of ink restricting for the novice by using swatch measurements and preset targets to determine optimum settings, allowing the user to quickly profile.
The user is encouraged to initially just follow this simple process. As the user becomes more familiar with the profiling process then it might be desirable to use the improved advanced user tools (found in the Black Diamond areas). Click the
This option allows you to set each ink restriction using the legacy method. To use Legacy Ink Restrictions:
In the [Ink Restriction] section, you can select a value for each ink channel before printing a swatch enabling [Allow selection of swatch without printing] box.
One primary goal of the new auto ink restrictions is to always result in the same target densities for dot percentages of each process channel. The user is able to control various amounts of inks to define the ink separation, but the tone control for the process channel will be internally adjusted to achieve the same target densities. This means that regardless of how you modify any of the settings (other than max density of darkest ink) the results should generally “look” the same. By design, the user is unable to control the target densities for the tone control in the ink restrictions step. This can be separately achieved by establishing target densities in the “Advanced” portion of the calibration step. Potentially having a separate control to define the N-factor target for each process channel could be added at some point. Because of this design consideration, the new ink restrictions are not fully customizable (unlike Separation Control curve). Separation Control allows the user to completely define curves to represent how inks will be used, and when applicable, how light and dark inks will interact. One very difficult aspect of having this control is ensuring that the density actually always increases in a reasonable fashion when various light and dark inks are being mixed. The new Ink Restriction tool was intended to be a precise and easy way for the majority of users to get a quality print mode completed with minimal effort. You can see the power of the transition calculation in the new Ink Restriction by viewing the Linearization results (Calibration > Advanced > Linearization Table tab) thus achieving the tone objectives of a basic calibration.
NOTE: Some printers may not support Automatic Assisted Ink Restrictions.
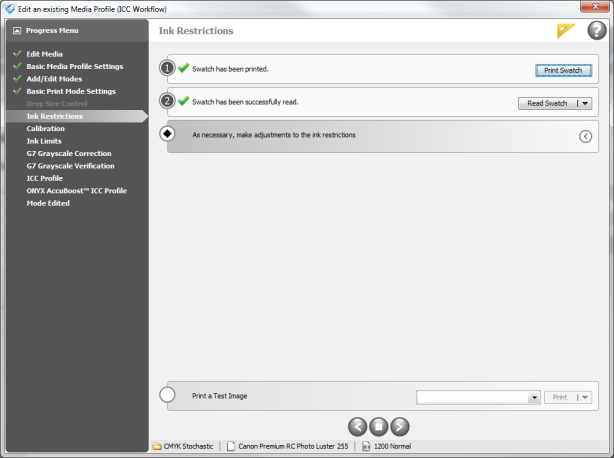
1. Click [Print] to open the “Print Ink Restriction Swatch” dialog. Select your color device and page size and click [Print]. See Print Ink Restriction Swatch for a detailed description of the dialog. 2. Read the Ink Restriction Swatch.
The "Read Swatch" dialog gives instruction for and feedback on patch measurements. It also allows for device specific features. Ink Restriction values are displayed as a graph after reading the Ink Restriction Swatch. Clicking the
After reading the Ink Restriction Swatch the [Initial Gamut Size] selection will be applied to the measurements. The values for each channel and a plot of the Ink Restrictions and transitions will be displayed. Generally, you may not need to make further adjustments and can now move on to the Calibration step.
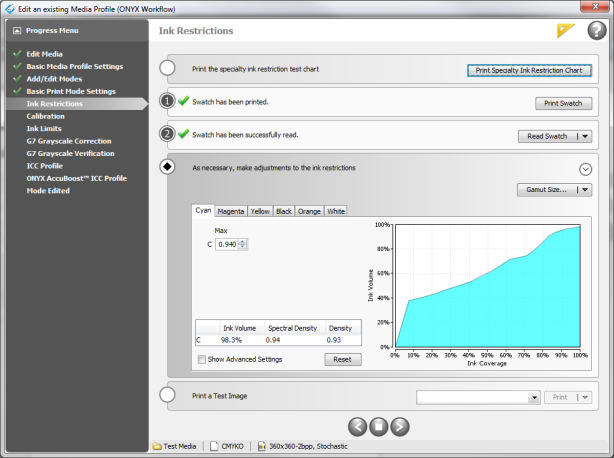
Start: Sets where the ink level begins relative to the previous level. This setting is applicable only if there are multiple levels of ink in the same channel (e.g. dark ink plus light ink) and does not apply to the first ink level. Max: This setting allows you to increase or decrease the software selected Ink Restriction per channel. End: Sets where the ink level ends relative to the next level. This setting only applies if there are multiple levels of ink in the same channel (e.g. dark ink plus light ink) and does not apply to the last ink level. Transition: If your ink configuration has multiple ink levels per channel (e.g. dark ink plus light ink) this setting controls the rate of the transition between the two levels. It can be observed within the plot as a change in the angle of the curves. Ink Volume and Density: Display the current ink volume and (spectrally based) density. Reset: Resets the spinner controls on the current tab to the settings selected by the [Gamut Size] button. Show Advanced Settings: Brings up additional settings for adjusting the software selected Ink Restriction.
NOTE: When changing these values the software will automatically recalculate the best combination of light to dark ink to optimize the transition. TIP: To learn more about Automated Ink Restrictions, see Understanding Automated Ink Restrictions. TIP: For tips on running backlit go to this Thrive article and click the Maxi-imize section
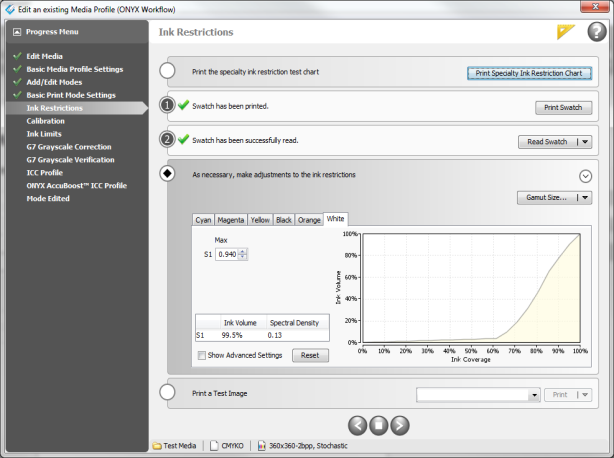
This option is under the advanced ink restriction settings for white or specialty inks (Figure 3). In the case of white and specialty inks, automatic adjustments can be detrimental. Since white and specialty inks usually aren't directly measured, there is no such a thing as a maximum useable density because there are legitimate readings to determine this.
The value entered in the field for [Max], is defined by the drop-down menu. For [Max W], you can select [Relative Max Density] or [Absolute Ink Volume]. Absolute Ink Volume - If the value entered in the [Max] field is set to ".81" and set to [Absolute Ink Volume], the ink volume result is 81% Relative Max Density - If the value entered in the [Max] field is ".81" and set to[Relative Max Density], the ink volume result is 62.6%
Use Linear Process Values This setting removes the N-factor on the tone curve, allowing for a completely linear transition. This is more desirable for white and specialty inks, especially flood fills. NOTE: [Use Linear Process Values[ is only available on single-level ink channels (ones without light ink).
1. Print the Ink Restriction Swatch. 2. After reviewing the swatch for artifacts, select the patch (%) that best represents the maximum amount of ink before artifacts. Click the appropriate patch ([Basic] tab), or enter the appropriate value ([Advanced] tab).
NOTE: You can find the explanation of settings in sidebar Tips.
|
Figure 1
Figure 2
Figure 3 |
 button to fine tune these to achieve an optimized starting point while still preserving the transitions, particularly when transitioning between light and dark inks sets.