| Bleed | |
|---|---|
|
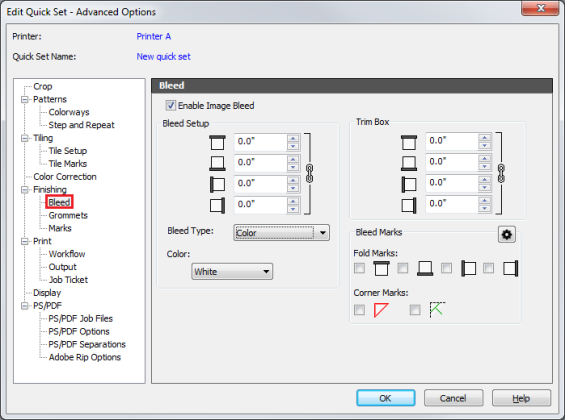
The Bleeds can easily be added to an image. You can set following options checking [Enable Image Bleed].
By default top, bottom, left, and right bleed values are locked. To set the values independently, unlock them by clicking the link icon. Changed bleed values are reflected in an update to the print size values. The default bleed sizes are set to “0”.
Top: This will expand the top of your image. You can adjust the value or enter a custom value. Bottom: This will expand the bottom of your image. You can adjust the value or enter a custom value. Left: This will expand the left side of your image. You can adjust the value or enter a custom value. Right: This will expand the right side of your image. You can adjust the value or enter a custom value.
There are 3 types of bleed. You can choose following options from pull down menu.
[Color] fills the bleed with a certain color. The default color is white. [Color] also has a [First Pixel] option that will find the first pixel of the image and set the entire bleed to that color. [Mirror] will make a mirror copy of your image and fill it into your bleed. The default setting is 0.25 inch (5 mm) with fold marks, and a displayed image has 1 inch (25.4 mm) bleed. [Duplication] fills the bleed with the colors from the each edge of the original image.
[Trim box] makes extra white space in outside of bleed. By default top, bottom, left, and right bleed values are locked. To set the values independently, unlock them by clicking the link icon and enter value for Top, Bottom, Left and Right.
[Bleed Marks] are additional lines that assist for finishing work. You can set mark line type, line length, gap length, line width, and line color in the “Setup Mark Line Style” dialog (Figure 2) by clicking
Line Type: There are 3 types of lines.
Fold Marks – This option generates fold lines between bleed and an image.
Corner Marks – This option generates triangle line for "Banner" and diagonal line for "Frame" in each corner of an image for fold.
TIP: To learn more about Bleed, see a white paper and ONYX Video. |
Figure 1
|
 button.