| Marks | |
|---|---|
|
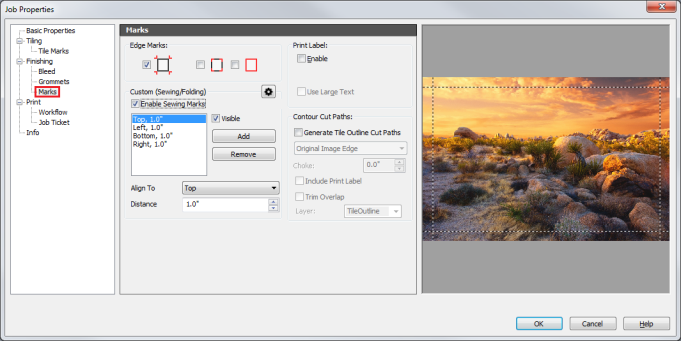
The Marks option allows you to determine the marks that will be used with your image. [Marks] assist you in cutting, welding, and framing your finished job (Figure 1). You can also set up the [Print Label] from the [Marks] option. The [Print Label] contains information about your job such as user information, job ticket, job information, print information, and date/time printed. This information is printed with your image in one of the margins and can help you recreate the image at a later date.
This option has 3 types of mark: [Registration Mark], [Crop Mark], [Crop Outline]. Check a box you want to use.
This option allows you to set [Sewing] marks and [Folding] marks in custom locations on the image. The default is set to add lines to all sides of the image, at a distance 1 inch (2.54 cm) from the edges.
To use Sewing / Folding Marks :
Check [Visible] box so that the sewing marks will be visible in the preview and printed on the job. If the box is not checked, nothing will be printed for this sewing mark. This option may be used when you need to see where a specific mark is by turning it on or off. You may also have a sewing mark saved to use later and need it temporarily turned off.
To add a new mark:
To change a mark placement:
To change a mark distance:
To remove a mark:
The [Print Label] prints job information at the end of the printed image. To use the[ Print label], check a box of [Enable], and click [Setup] button. You can then select the type of information you want to include in your Print Label by scanning through and marking the appropriate options.
This option determines where the Tile Outline Cut Path will be created. Check the [Generate The Outline Cut Paths] box and select the following options. In default setting is checked [Original Image Edge].
Original Image Edge - This option generates a cut path around the original image area. Bleed Edge - This option generates a cut path around the bleed area. Trim Box Edge: - This option generates a cut path around the trim area.
NOTE: If you do not have a contour cutting device, this option will not work.
[Choke] modifies the cut path by moving the path inside the edge by the chosen distance.
This option configures RIP-Queue to place cut lines in the center of the overlap.
|
Figure 1 |
 button for setting up mark line style. You can set [Line Type], [Line Length], [Gap Length], [Line Width], and [Line Color] in the “Setup Mark Line Style” dialog (Figure 1).