| Printing and Cutting an Image | |
|---|---|
|
The Printer, Cutter and Media Settings section located at the bottom of the main window allows you to set your printer, cutter, and media options as well as print your images.
The [Printer], [Cutter] and [Media] Settings section includes the following settings: The [Printer] option (Figure 1) allows you to select which printer you want to use. Click the down arrow to select a printer from the list of installed printers.
The [Cutter] option (Figure 1) allows you to select which Cutter you want to use. Click the down arrow to select which Cutter you want to use. NOTE: You must first Add a Cutter in the Preference > Cutters section before you select a cutter.
The [Media Group] option (Figure 1) allows you to select which Media Group you want to use. Click the down arrow to select the Media Group you want to use. NOTE: [Media Groups] are dependent on the printer you select in the [Printer] option.
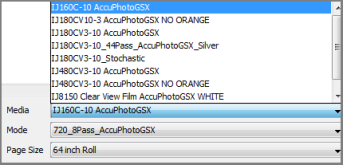
The [Media] option (Figure 2) allows you to select which Media you want to use. Click the down arrow to select the Media you want to use. NOTE: The [Media] available to you is dependent on the printer you select in the Printer Option and your Media Group.
The [Mode] option (Figure 2) allows you to select which Mode you want to use. [Mode] determines your resolution and color management settings. Click the down arrow to select the Mode you want to use.
The [Page Size] option (Figure 2) allows you to select which Page Size you want to use. Click the down arrow to select the Page Size you want to use. NOTE: The [age Size] you select must match the Page Size currently loaded in your printer.
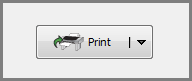
The Print Button (Figure 3) allows you to [Print], [Cut], or [Print and Cut] your images. You can determine what you want to do by clicking the down-arrow on the button and choosing the appropriate option. When you are ready to print, click the [Print] button to print the images that are currently displayed.
|
Figure 1
Figure 2
Figure 3 |