|
DeviceLink profiles directly encode a transform from two profiles, such as an input and output profile. This can result in more accurate profiles, and the ability to use different profiles for CMYK and RGB images and elements, even from the same PDF file.
ONYX designed DeviceLink+™ to be simple to use and transparent to your workflow. You can make fast, effective, output profile changes without printing and measuring new swatches.
Key features
- Automatically generate DeviceLink profiles
- Easily apply ink savings for any media profiles using GCR+ (when embedded input profiles are disabled)
- Achieve consistent color across devices with new simulation and proofing controls
- Improve color accuracy across all existing media profiles at the click a button
- Streamline workflows with DeviceLink+ and Quick Sets
There are 3 options in the DeviceLink Setup dialog (Figure 1).
- No DeviceLink - The input and output profiles are connected with regular color management processing.
- Auto DeviceLink+ - DeviceLink profiles are automatically built as needed, using the configured settings in the ICC Profile Setup and the mode's ICC output profile. As long as the DeviceLink profiles remain in the mode, they only need to be built once.
- If no DeviceLink profiles exist in a mode that match the current color settings for a job, they will be built in between the preview rip and processing stage when a job is submitted to RIP-Queue
- If DeviceLink profiles exist in the mode, then the file will process as normal
- If a job is selected during ripping in RIP-Queue, the rip status above the job queue will display the status of the DeviceLink build, as well as the usual processing info
- If you right click on a processed job and select RIP Log..., DeviceLink profiles that were built with that job will be listed
- The DeviceLink profiles are built and in the mode that is selected in the Quick Set
- DeviceLink profile file names consist of the input and output profile names and a time stamp. The file extension is [.IccDL] DeviceLink+ profiles are exported as part of the mode in an OML or PrnInst
 DeviceLink+ Build options DeviceLink+ Build options
This allows you to build custom DeviceLink profiles using different profile generation settings per image element type.
For example, you can set a Quick Set using DeviceLink+ profiles to have different Black Generation and Gamut mapping for CMYK images vs RGB images.
In the DeviceLink Setup dialog, check [Use custom DeviceLink+ build options] and click the [Options…] button. This opens the DeviceLink+ Build Options dialog. This dialog only displays ICC build options that are applicable to DeviceLink profiles and the colorspace of the output profile for the mode (Figure 2).
(NOTE: The initial values are displayed from the mode’s default ICC profile. These are also values that are used if you setup [Auto DeviceLink+], however, don’t
check [Use custom DeviceLink build options] box.)
TIP: The [DeviceLink+ Build Options] dialog is very similar to the ICC Build Options dialog in Media Manager. However, it only has options that are applicable for DeviceLink profiles. These options function the same as with traditional ICC profiles when building a DeviceLink profile.
- Select Device Link… - A third-party, non-mode-based DeviceLink profile can be selected. This functionality was previously possible only by browsing and selecting a DeviceLink profile from the input profile dropdown lists.
To create and select DeviceLink profiles
You can configure the use of DeviceLink Profiles from the [Printer and Media] tab of Job Editor.
The DeviceLink+™ profile button in the [Color Management] section indicates the DeviceLink profile status for the selected mode and Color Management setup.
After configuring your DeviceLink+ setup, this button allows you to manually build DeviceLink profiles if you want to preview the effect on a job, or if you want to save a step by not having them build automatically when the job is submitted to RIP-Queue.
The [DeviceLink+ profile] button has three statuses, indicated by the appearance of the button, as well as tooltips. (NOTE: If there is No DeviceLink button next to the [Change Profiles…] button, your key doesn’t have permission. Please contact your ONYX authorized reseller or email sales@onyxgfx.com)
-
 Empty: This indicates no DeviceLink+ profiles are configured Empty: This indicates no DeviceLink+ profiles are configured
-
 Blue Link: This indicates DeviceLink+ profiles are configured, but they are not built. Click the button in this state to manually build the DeviceLink+ profile(s) Blue Link: This indicates DeviceLink+ profiles are configured, but they are not built. Click the button in this state to manually build the DeviceLink+ profile(s)- The Build DeviceLink+ Profile(s) dialog shows the build progress.
- After the DeviceLink +profile(s) are built, the preview is automatically re-updated.
-
 Disabled button with a link: This indicates the specified DeviceLink+ profiles exist for the selected print mode, and will be used if embedded input profiles are disabled. Disabled button with a link: This indicates the specified DeviceLink+ profiles exist for the selected print mode, and will be used if embedded input profiles are disabled.
-
In the [Printer and Media] tab, click [Change Profiles…] button. This opens the ICC Profile Setup dialog (Figure 1).
-
In the [Profiles] tab, click the blue button ( ) that is called [Setup DeviceLink] (Figure 8). This opens the DeviceLink Setup dialog. (NOTE: If input profile is selected, the button is grayed out) ) that is called [Setup DeviceLink] (Figure 8). This opens the DeviceLink Setup dialog. (NOTE: If input profile is selected, the button is grayed out)
-
Select the option that you want to use from down-arrow menu (Figure 2).
-
Click [OK]. You will now see a Blue link button ( ).
-
Click [OK] again. The status of button will be ( ). If desired, click the button to manually build the DeviceLink profile (Figure 3).
|
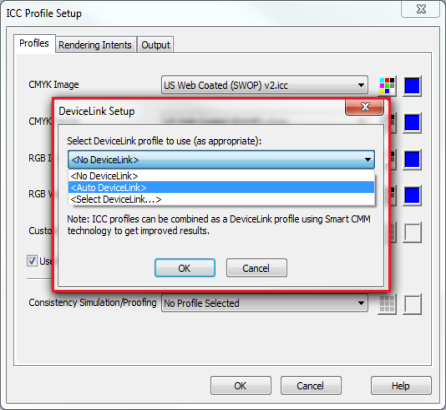
Figure 1

Figure 2
|